How to Set Up the PetSafe® Stay & Play® Wireless Fence with Replaceable Battery
Setting up the PetSafe® Stay & Play Wireless Fence will take approximately one day.
A minimum of 14 days of training is recommended.
Environmental factors, such as metal sheds, may affect the fence signal.
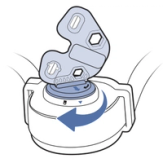
Insert the Battery into Your Collar
Insert the battery using the provided Test Light Tool or a coin to prevent damage to the battery. Line the arrow on the battery up with the arrow on the collar. Turn the battery to the lock symbol on the collar.
Each battery can last 1 to 2 months, depending on the frequency of use and ensuring the collar is powered off in between uses.
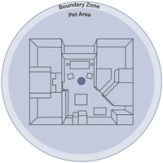
Plan Your Containment Area
The base unit sends out a circular signal to create the wireless fence. Before placing the base unit, it is important to determine your desired containment area. For assistance determining your containment area and settings, check out our Fence Planning Tool.
Placing the Base Unit
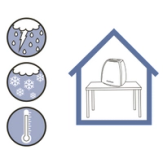
The base unit location will also need to be considered. Once the size of the fence is determined, the base unit needs to be placed in the middle of your desired area to form the fence. Make sure the location for the base unit is:
- Near a wall outlet
- In a climate-controlled environment
- 2-4 feet above ground
- 5 feet away from metal and appliances.
Visit How to Select a Suitable Location for the PetSafe® Stay & Play® Fence for a more in-depth look into a suitable location for your base unit.
Do Not Place in a Metal Building.
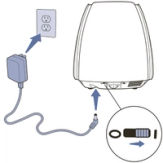
Setting Up the Base Unit
Plug the power cord into the bottom of the base unit and into a standard wall outlet. Power the unit on by moving the switch from 0 to the I.
To mount the base unit on a wall, visit How to Mount the PetSafe® Stay & Play® Wireless Fence Base Unit.
Set Up Your Collar
When your collar is fully charged, unplug it and power it on by pressing and holding the power button for 5 seconds and release. The light will flash green, then red to indicate the collar level and back to green.
Set the Correction Level to Level 2 or Higher
Once the collar is powered on, press and release the power button. It will flash red to indicate the current correction level. One blink is level one (tone only), Two blinks is level 2, and so on. Pressing and releasing the power button within 5 seconds of the previous press will advance the collar to the next level. Visit How to Change the Correction Level on the PetSafe® Stay & Play® Fence Collar for additional assistance with changing the levels.
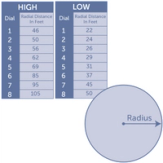
Set the Settings on Your Base Unit
The High/ Low switch and the Boundary Dial work together to cover the area needed. If you used the Fence Planning Tool in step 1, you could use the settings the tool provided, or you can also use the guess and check method.
The distances given in the graph image above are the radial distances
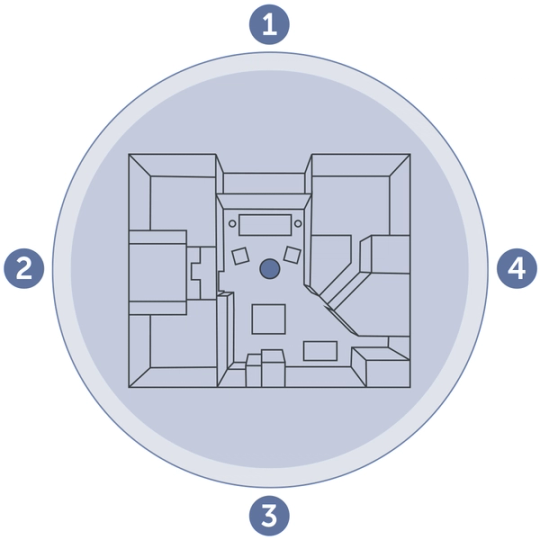
Test Your Boundary
Using the provided Test Light Tool, walk your collar to the boundary. Test at least 4 sides of the boundary to ensure proper coverage.
- Adjust the boundary settings on the base unit as necessary.
- Visit How to Test the PetSafe® Stay & Play® Fence for further assistance with testing the boundary using the Test Light Tool.
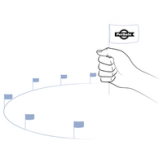
Place the Boundary Flags
Place the boundary flags where the warning zone begins.
Walk the collar to the boundary, holding the collar at head-height of the pet. When the collar first beeps, place a flag in that location and walk back into the containment area. Repeat these steps every 5 feet all the way around the containment area.
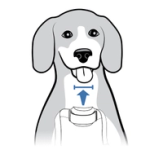
Fit the Collar
Do not turn the collar on. Visit How to Fit the PetSafe® Stay & Play® Fence Collar to achieve the fit needed for the system to be effective. The electronic portion of the collar should be centered on the front of the pet’s neck and tight enough that one finger fits behind the contact points.
Train Your Pet
Training your pet will require a commitment of at least 14 days. Do not attempt to use the system prior to completing the training program. Review the training program below.
- How to Train Your Pet to the PetSafe® Stay & Play® Fence Phase 1: Boundary Awareness
- How to Train Your Pet to the PetSafe® Stay & Play® Fence Phase 2: Introduction to Static Correction
- How to Train Your Pet to the PetSafe® Stay & Play® Fence Phase 3: Distractions
- How to Train Your Pet to the PetSafe® Stay & Play® Fence Phase 4: Unleashed Supervision
- How to Train Your Pet to the PetSafe® Stay & Play® Fence Phase 5: Pet Monitoring
Contact Customer Care
If you need further assistance, please contact our customer care team.