How To Create a Fence on My PetSafe® Guardian® GPS 2.0 Dog Fence + Tracking System
If you want to edit a current fence, visit How To Edit a Fence on My PetSafe® Guardian® GPS 2.0 Dog Fence + Tracking System.
If you want to delete a fence, visit How To Delete a Fence on My PetSafe® Guardian® GPS 2.0 Dog Fence + Tracking System.
You can create one fence to try without a subscription. For more than one fence, you will need to set up your collar(s) and subscription(s).
For more information on setting up collars, visit How To Set Up My PetSafe® Guardian® GPS 2.0 Dog Fence + Tracking System.
For more information on setting up your subscriptions, visit How To Set Up a Subscription for My PetSafe® Guardian® GPS 2.0 Dog Fence + Tracking Collars.
Don’t forget to click on Fences and assign your dog(s) to the appropriate fence before letting your dogs out. For more information, visit How To Assign or Remove a Dog from a Fence on My PetSafe® Guardian® GPS 2.0 Dog Fence + Tracking System.
Things To Know
- You can create up to 50 fences.
- Each collar can run on a different fence if desired.
Create a Fence
Open the My PetSafe® app.
Click on Fences, and then the (+) in the upper right-hand corner.
Follow the on-screen prompts to enable location services. It is important to allow the app to use your location, or you will not be able to create a fence.
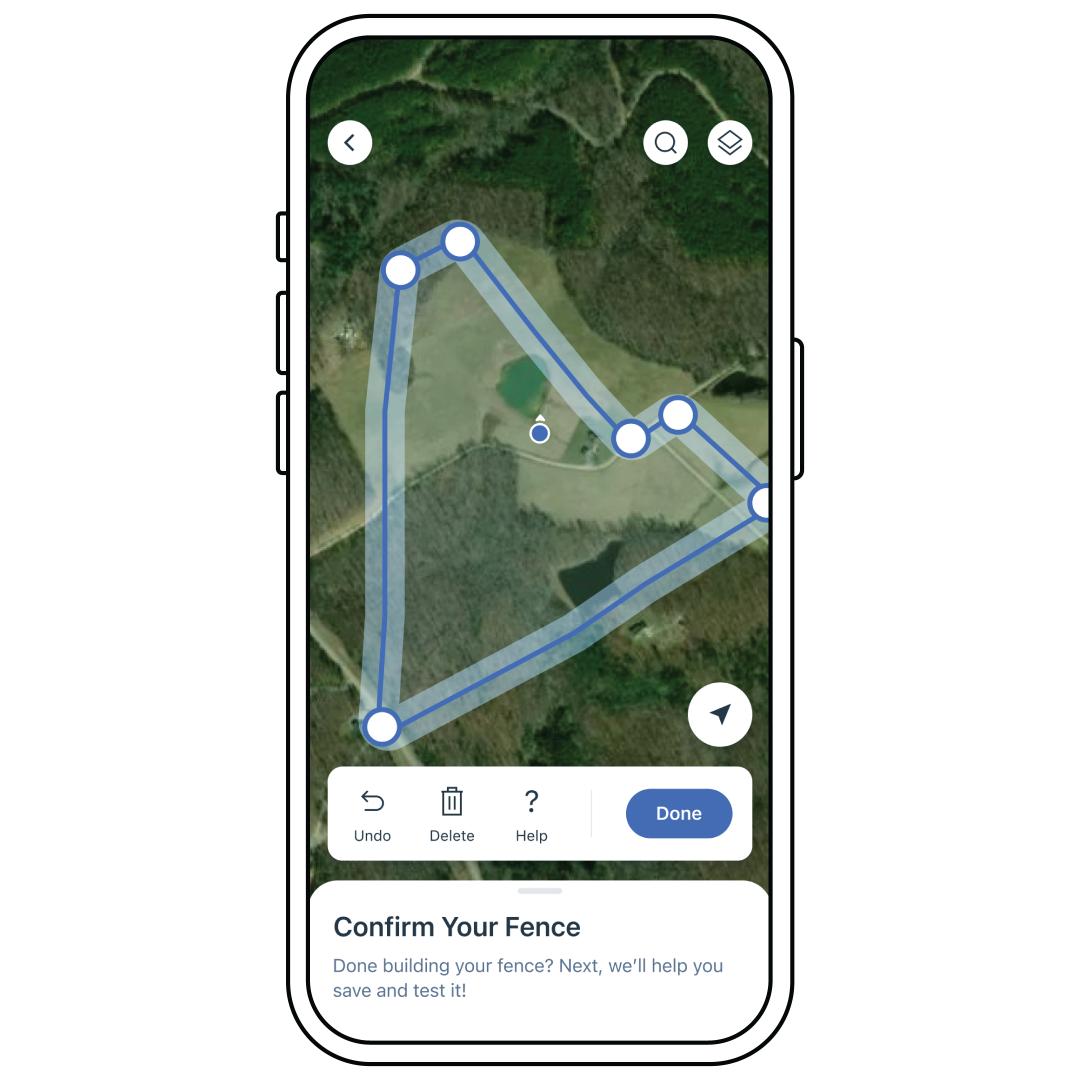
Tap a spot on the map to place your first fence post.
- Tap to add a fence post.
- Press and drag on a fence post to move it.
- Tap an existing fence post to remove it.
- Press the back arrow symbol on the top left to undo.
- Press the forward arrow symbol on the top left to redo.
- Press the trash can symbol on the top left to start over.
- Tap the first point to complete your fence.
- For more information on fencing requirements, check out Things to Keep in Mind When Setting up Your Fence at the end of this article.
Add the name of your fence here and then tap Continue.
Select the dogs you want added to the fence. Then tap Next.
Ensure your collar has a Bluetooth connection.
If not, while your collar is powered on, press the power button. The Battery and Signal Status LEDs slowly pulse blue when in Bluetooth Pairing Mode. At this point, you have 25 seconds to pair your phone.
Tap Next. Your phone will update your collar with the new fence.
Tap Done. You can now test your fence. For more information, visit How To Test My PetSafe® Guardian® GPS 2.0 Dog Fence + Tracking Collar and Boundary.
Things to Keep in Mind When Setting up Your Fence
- You must have a minimum of 4 fence posts and a maximum of 32 fence posts for a fence boundary. Keep your boundaries simple! Make sure to have as few fence posts as possible. For example, for each straight line on your boundary, keep it to 2 fence posts, the starting post and the end post. Excessive posts may lead to issues with the location of the boundary.
- Use a simple shape. Complex shapes increase the chance your dog may receive unexpected warnings or corrections.
- Keep at least 8 feet between each fence post.
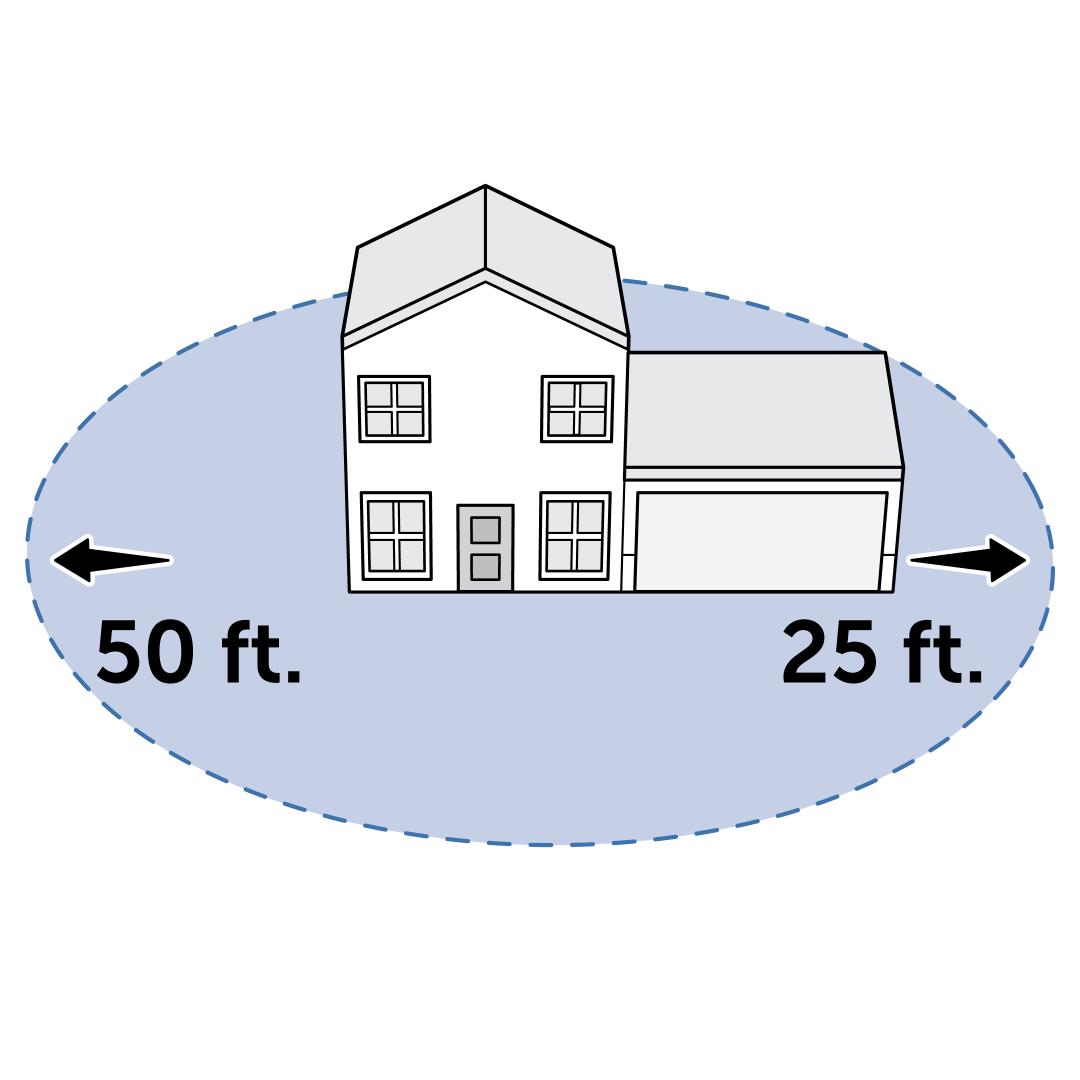
- Digital fence posts must be placed at least 25 feet per story away from any structure. For example, to create a boundary that encloses a one-story detached garage and a two-story house, you would need to place digital fence posts at least 25 feet away from the garage and at least 50 feet away from the house.
- Fence lines cannot overlap.
- Opposing lines of digital fence posts must be at least 35 feet away from one another to avoid creating areas too narrow for your dog to pass through without being corrected.
- Avoid sharp corners in your layout to prevent unexpected warnings and corrections.
- Whenever possible, place digital fence posts in areas with a clear view of the sky. This allows the collar to receive GPS data more quickly.
- If your dog is allowed in the house or garage, the boundary must surround the house or garage.
- To ensure your dog’s safety, place all digital fence posts at least 15 feet away from any roads or other dangerous areas.
- If a physical fence exists along the desired boundary, place the digital fence posts at least 10 feet outside of the physical fence. This allows your dog the most usable area inside the physical fence.
- Your fence must cover at least ½ an acre. The fence can be as large as you want, but we recommend avoiding roads and restricted areas.