How to Perform a Systems Test on My PetSafe® YardMax® In-Ground Fence™ System
Before You Begin
To perform the Systems Test, a 10 to 15- foot piece of new boundary wire will be needed.
Before beginning any troubleshooting, secure your pet(s) and remove collar(s).
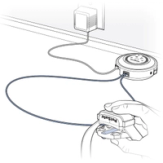
Ensure the plug is securely inserted into the outlet and wall unit.
Remove the boundary wires from the wall unit.
- If you do not see the loop light go out, please contact Customer Care for further assistance.
Unplug the unit from the outlet.
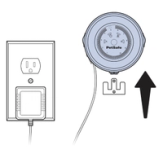
Remove the wall transmitter from the wall by sliding it up and off the wall bracket.
Cut a new 10 to 15-foot length of boundary wire from the spool.
- Measuring the wire fingertip to fingertip twice will typically be between 10 and 15 feet.
- Use only boundary wire rated for outdoor, in-ground use.
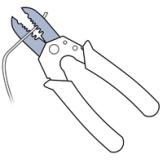
Strip 3/8 inch of insulation off each end of the 10 to 15-foot wire.

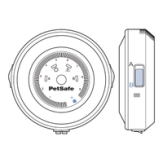
Plug the ends of the short wire into the boundary terminals. Lay the wire out on the floor so that it is not touching itself and resembles a circle. Plug the wall transmitter back into the wall outlet. Be sure to bypass any surge protector in use.
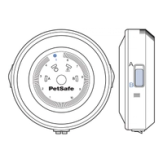
Set the AB switch to B. Also, set the boundary width dial to number 5. Plug the unit back into the wall outlet.
Make sure your collar contact points are the same length and hand tight.
Set the collar to the highest correction level. For assistance changing your correction levels, visit How to Change the Correction Level On My YardMax® Collar
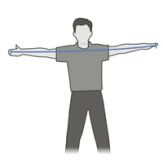
While standing outside of the wire circle, hold the collar in your hand at your dog’s head height. Approach the wire slowly. Use the test light tool on the contact points. Visit How to Test My YardMax® Collar for Correction for assistance using the Test Light Tool.
Do not swing the collar. Once the collar flashes red, it is indicating correction. Take note of where the collar activates.
Due to the short length of the wire on the Systems Test, it is expected that the warning zone may seem non-existent and the difference in where the collar activates will be minimal.
Set the wall transmitter dial to 10 and repeat step 8. If your collar activates slightly further away from the short wire, your system is functioning properly.
- If you have bypassed any surge protection for this test, repeat steps 5– 12 with the surge protection connected to ensure the same results. If your system does not give the same results, your surge protection could be causing issues and you should contact Customer Care for further assistance.
Interpret your Systems Test results:
- If your wall unit alerted you to an issue by not having a loop light before completing the Systems Test, you have a full break in your yard wire. Visit Find and Repair a Full Break in My PetSafe® Fence Wire for further assistance.
- If your system appeared to work normally with your yard wire plugged in but the wire had dead zones, or the loop light was on and then would go out after a delay, you have a partial break in your yard wire. Visit Find and Repair a Partial Break In My PetSafe® Fence Wire for further assistance.
- If your wall unit has a loop light with your yard wire plugged in but the collar Is correcting in the safe zone, you are experiencing an amplified signal. Visit How to Repair A YardMax® System With an Amplified Signal for further assistance.
- If your collar corrected in the exact location when the dial was set to 5 and 10 on the Systems Test, contact Customer Care.
- If your collar did not correct at all, and you are experiencing issues with your system, please contact Customer Care.
- If your wall unit did not have a loop light on the Systems Test, contact Customer Care.
Set your collar correction level back to the dog’s recognition level after the test. For assistance setting the correction level, visit How to Test My YardMax® Collar for Correction.
Contact Customer Care
If you need further assistance, please contact our customer care team.