PetSafe® In-Ground Containment – How to Install Your Basic In-Ground Fence™
Important Information
- Installing the wired fence system takes on average 1 to 2 days.
- A minimum of 14 days of training is recommended.
- Environmental factors in the yard, such as metal sheds or utility wires, may affect the fence signal.
- We recommend calling to have utility lines marked prior to installation to avoid damage to existing lines.
- Visit http://call811.com for contact information on marking utility lines at your home.
Plan Out Your Fence
Planning out the fence area prior to setting it up will help make the installation process easier. There are many layout options to customize the system to your yard.
You should consider:
- The boundary wire needs to be a complete loop, beginning and ending at the fence base unit
- Gates along the boundary
- Existing fencing
- Areas you want to restrict your pet from entering
- In-ground utility lines
For detailed information and assistance, go to our article on how to determine your fence layout.
Once you have planned the layout, use our In-Ground Fence Planner to try out the design and get a rough idea of how much wire you will need for installation.
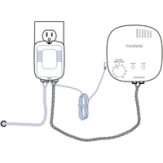
Identify the Location for Your Fence Base Unit and Surge Protector
The location should be:
- Weatherproof
- Temperature controlled
- 5 feet away from metal
The outlet should be at least 30 feet away from any breaker boxes.
Install the Surge Protector
Turn the power off to the electrical outlet from the breaker before installing the surge protector.
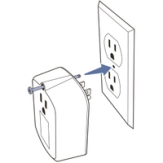
- Remove the center screw from the outlet.
- Hold the cover in place and plug the surge protector into the outlet so that the hole for the screw lines up with the center hole on the cover.
- Replace the center screw through the surge protector hole into the center of the cover to hold in place.
- Turn the power back on to the outlet from the breaker.
Install the Fence Base Unit
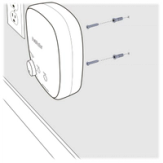
Mount the base unit using the mounting template and appropriate mounting hardware. Keep in mind the length of the power adapter cord is the maximum distance your base unit can be from the surge protector.
Connect the Terminals
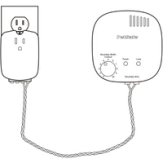
- Cut two wires from the boundary wire spool that are slightly longer than the distance from the base unit to the surge protector.
- Strip 3/8 inch of insulation from each end on both wires.
- Twist the wires together until there are 10-12 twists per foot.
- Press the terminal tabs on the base unit and insert the wires from one end of the twisted wire, one wire per terminal. Then release the tabs to lock the wire into place.
- Insert the other set of wire ends into the black terminals on the surge protector.
Create Your Boundary
Lay the wire along your desired boundary layout, but do not bury it. The boundary wire needs to be a complete loop, beginning and ending at the fence base unit.
Additional information:
- Signal Cancelation- You cannot use a separate piece of wire to cancel the signal along the boundary. The signal will only be cancelled if one part of the boundary wire is twisted with another part of the boundary wire.
- Connecting Wire-If you need to use more than one spool of wire, make sure you connect the ends using the proper splice method.
- For more information, go to our article on how to properly splice your boundary wire.
- Additional Wire-Although the system kit comes with 20-gauge wire, you may choose to use wire up to 14 gauge. For the best results, keep the gauge consistent for the entire system.
- However, if necessary, you can use up to two different gauges and they must be a one-step increase or decrease of each other. Ex. 20g and 18g
Connect the Wires
Plug the power adaptor into the base unit and surge protector. The power indicator light will glow red.
Plug the two twisted boundary wire ends into the red terminals on the surge protector.
Turn the boundary dial slowly until the loop indicator light illuminates.
Test the Layout
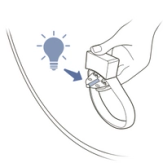
- Test the collar at several points along the boundary to confirm everything is working.
How do I test with the collar?
- Adjust the boundary control width dial as needed. Test different boundary levels to find the best distance that works for the yard.
- Increasing the dial will result in the collar activating much before the boundary wire.
- Decreasing the dial will mean the collar will activate closer to the wire.
Bury the Wire
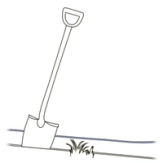
- Dig a narrow trench 1-3 inches deep. The trench only needs to be as wide as the wire.
- Place the wire loosely into the trench to allow the wire to expand with temperature changes. A paint stick or something similar can aid in pushing the wire into the trench.
- Cover the trench with excess dirt.
- Marking the location of any splices after you bury it will be helpful for future maintenance if necessary.
Crossing a Hard Surface
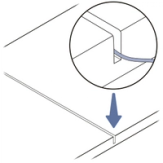
- If there is an existing expansion joint, clean the debris out, then run the wire through it.
- If there is no expansion joint, use a circular saw to cut a path, clear out the debris from cutting, then run the wire through it.
- Cover the path in the driveway with a waterproof compound, such as silicone caulk, to protect the wire from damage.
Crossing High Traffic Areas
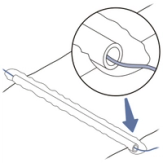
Run the wire through a flexible hose or tube to protect the wire for areas that get driven over frequently. Make sure it does not contain metal like some mesh reinforcement tubing. If you use a garden hose, be sure to cut off the metal ends.
Final Steps
Once everything is installed, test the boundary with the collar again. Make sure everything is working properly and make any necessary adjustments to the boundary control dial.
Important: Training is essential, so your dog becomes familiar with the pet area. Training will cover collar settings, boundary awareness, distractions and eventually, off leash in the pet area. For more information, go to our article on How to Train Your Pet on Your Containment System.
Contact Customer Care
If you need further assistance, please contact our customer care team.