How to Use Your Elite Outdoor Bark Control
Adjustable range up to 50 feet and. Add extra units for larger yards.
Requires one 9-volt alkaline battery (not included).
Set up to two timers on the birdhouse to save battery life and only use the birdhouse when barking typically occurs.
How it Works

The Birdhouse detects when your dog begins to bark and sends an ultrasonic sound that is unpleasant to your dog. This sound will be associated with the unwanted behavior of barking.
Understanding Your Elite Bark Control
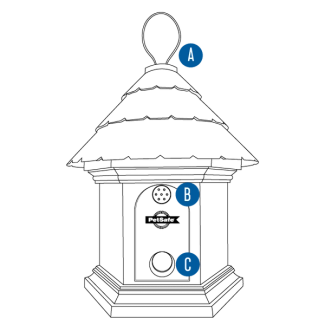
Hook
Used to hang the unit.
Microphone
Detects barking.
Speaker
Sends out ultrasonic sound when barking is detected.
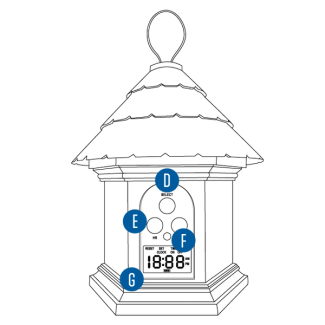
Select Button
Used to navigate screen and make selections.
Timer Buttons
Used to set the clock and timers.
Light
Indicates the battery level and when the sound is released.
Digital Display
Shows the time, battery status and other functions.
Set Up the Birdhouse

Remove the battery door on the back of the birdhouse.
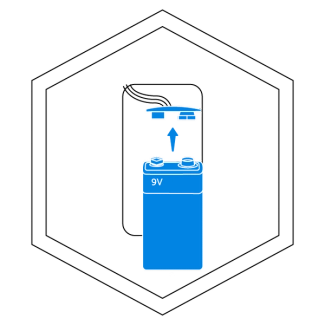
Insert a 9-volt alkaline battery into the battery compartment.

Replace the battery door.
Test the Birdhouse
Follow the instructions to test that the birdhouse is powered on and working properly.

Press and hold the HR and MIN buttons simultaneously for five seconds until the screen displays tSt.

Speak into the microphone. The light will flash red and there will be three beeps to confirm that your voice was detected.
Set the Time
Follow the instructions to set the time of day on the birdhouse.
Important: When setting the time, make sure to set AM or PM as well.

Press the SELECT button until the screen displays SET TIME.

Press the HR button once to begin setting the time. Continue pressing the HR until the current hour is reached.

Press the MIN button to set the current minutes.

Press the SELECT button to confirm the time.
Set Timer 1
The birdhouse allows for up to two scheduled times to be on during a twenty-four hour period. Using this feature helps save the battery life and prevent dogs from becoming desensitized to the ultrasonic sound.

Press the SELECT button until the screen displays TIMER 1 OFF.

Press the HR button once to begin setting the time. Continue pressing the HR until the desired time for the birdhouse to turn off is reached.

Press the MIN button to set the minutes for the timer.
Press the SELECT button to confirm the time.

Repeat the steps above to set the start time for the Timer.
Set Timer 2
After setting the ON time for Timer 1, the birdhouse will automatically display TIMER 2.
- To set
Repeat the steps for setting Timer 1 above. - To skip
Press and release the SELECT button until the current time displays on the screen.
Place the Birdhouse
Now that the birdhouse is powered on and programmed, place it in the desired area. The birdhouse can hang or be left standing up.

Hang

Place on a flat surface
To ensure there is no signal interference, make sure that the birdhouse is:
Facing the area the barking occurs
No more than 5 feet off the ground
Not near any large obstacles
Contact Customer Care
If you need further assistance, please contact our customer care team.