How To Install the PetSafe® Microchip Cat Door in a Glass Door or Window
Important Information
- For double-pane glass, you will need to purchase the installation adapter to install it in glass. The installation adapter can be purchased through our website here. While you can install the door into single-pane glass without the adapter, we do recommend using the adapter.
- It is not possible to cut holes in tempered or double-pane glass, except at the time of manufacture. Consult a professional glazier or glass manufacturer to install the pet door in a glass door or window.
When you first open the box, do not throw away any included cardboard/paper pieces, these are used during install.
Before You Begin
- Program your cat’s microchip to the door and test the door in your desired location before cutting or installing. For detailed instructions, visit our article How To Setup the PetSafe® Microchip Cat Door and Prepare for Installation.
- We recommend contacting a glazier or glass expert before attempting to cut any glass surface to assist with installing your pet door and avoid any damage to your glass.

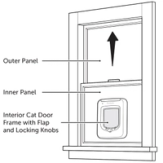
If installing the pet door in a sliding glass door or window, the pet door should be installed on the inner panel with the interior frame on the inside of the house. This will ensure the 4-way lock does not prevent your door or window from working properly.
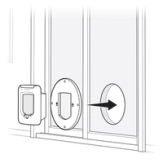
Determine Cat Door Placement
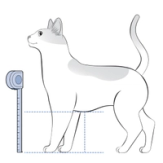
Measure your cat from the floor to their belly. Then mark that measurement on the glass door or window with a permanent marker.
Use a level to draw a horizontal line through the height marking to extend it.
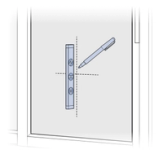
Decide where on your door to install the pet door.
- The cat door does not have to be installed in the center of your glass door or window. You may choose to adjust it to the left or right.
- If you are installing it in a paned window, align it within a pane for ease of installation.
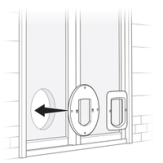
Use a level to draw a vertical line for the cat door to be centered on. If you are placing the pet door centered on your glass door or window, measure to find the center and draw a vertical line.
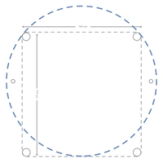
Cut out the template along the Glass Door line and tape it on your door, aligning the bottom of the circle with the height line you marked. Ensure this is the location you want to install the cat door and make any necessary adjustments.
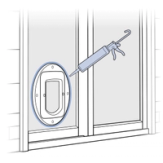
Cut the Opening
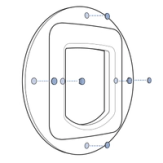
Cutting glass is a skilled job and should be done by a professional glazier or glass manufacturer. Your glazier will need to cut a circular hole with a 260 mm diameter if you are using the adapter. If you have single-pane glass and are not using the adapter, your professional glazier will need to cut a circular hole with a 215 cm diameter. The bottom of the circle will align with the belly height measurement. The template can be used for reference.
If you are installing into a single pane glass without the adapter, skip the install the adapter section.
Install the Adaptor
Slide one adaptor plate over the tunnel on the interior frame (with flap). Then insert the assembly into the cutout on the interior side of the glass.
From the exterior side of the glass, slide the second adaptor plate of the tunnel of the interior frame. Then install the exterior frame over the tunnel.
Important: Do not cut the tunnel. Key components are contained within the tunnel and any alteration to the tunnel will affect functionality.
Secure the Frame
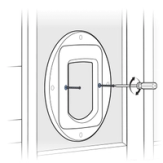
Using appropriate length screws, connect the interior and exterior frames of the cat flap.
Insert finishing plugs into screw holes in interior and exterior frames.
Use clear weatherproof caulk around the exterior frame for weather resistance.
Contact Customer Care
If you need further assistance, please contact our customer care team.