How to Install the PetSafe® Freedom® Aluminum Pet Door
Important Information
When you first open the box, do not throw away any included cardboard/paper pieces, these are used during installation.
Before beginning installation, it is best to gather the supplies you will need. This pet door fits doors that are 3/8 to 2-inches thick. If your door does not fall within those measurements, you may need additional supplies.
What Is Included:
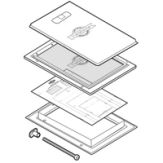
- Closing Panel
- Interior Frame with Flap
- Cutting Template
- Exterior Frame
- Screw Sleeves
- Nylon Screws
Tools You Will Need:
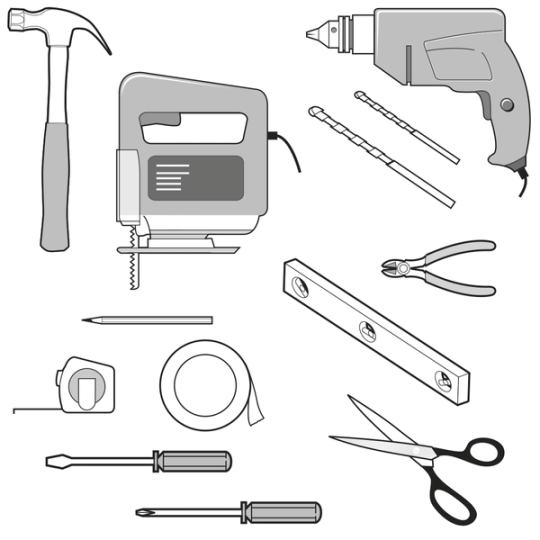
- Hammer
- Jigsaw
- Drill
- Drill Bit: 3/4 inch
- Philips and Flat-Head Screw Drivers
- Masking Tape and Duct Tape
- Wire Cutter
- Scissors
- Pencil
- Tape Measure
- Level
- Weatherproof Caulk
- Safety Gear
Measure and Mark
It is important to your pet’s well-being to measure and mark your pet’s shoulder height for proper installation placement. If there are multiple pets, use the tallest pet’s shoulder height measurement.
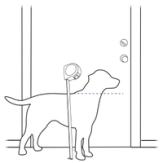
Measure and mark your pet’s shoulder height on the door with a pencil using either method:
- Have your pet stand next to the door and mark their shoulder height.
- Use a measuring tape to measure your pet from the floor to their shoulder. Then apply that measurement to the door.
Use a level to draw a horizontal line through the height marking to extend it.
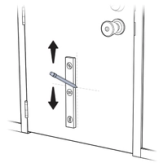
Decide where on your door to install the pet door.
- The pet door does not have to be installed in the center of your door. You may choose to adjust it to the left or right.
- If you are installing it in a paneled door, align it within a panel for ease of installation.
Use a level to draw a vertical line for the pet door to be centered on. If you are placing the pet door centered on your door, draw a vertical line for the center of your door.
Prep the Door
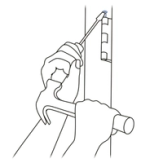
Remove the pins from the hinges using the flat-head screwdriver and hammer to remove the door from the doorframe.
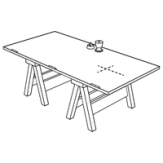
Place the door, interior side up, on a raised level surface suitable for drilling and cutting, such as a pair of sawhorses. Clamp or weigh down the door to prevent it from moving.
Place the Template
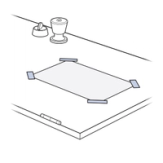
Cut the template according to your pet door size and tape on your door, aligning the height and center lines you marked to the ones on the template.
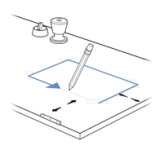
Make sure the template is at least 3 inches from the bottom and sides of the door to keep the structural integrity of the door. If it is less than, you will need to adjust your lines accordingly to ensure the 3-inch minimum.
Carefully trace around the template, making sure to trace underneath the tape and connect the corners. Then remove the template.
Cut the Pet Door Opening
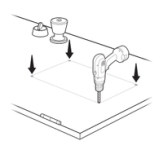
Ensure the area underneath where you have marked for removal is clear before drilling and cutting.
Drill 3/8 inch holes on the inside corners of the template. Hold the drill steady at a 90-degree angle and use a framing square to keep it straight.
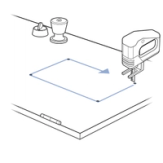
Place the jigsaw blade into a corner hole, making sure the blade goes entirely through the door and cut along the marking lines. Continue until an opening is made. You may need to finely trim the corners to create a 90-degree angle for the pet door to fit.
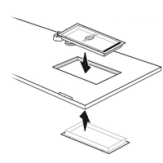
Check the fit of the frames in the opening. If either frame does not easily fit inside the opening, you may need to make adjustment cuts to the opening before proceeding with installation.
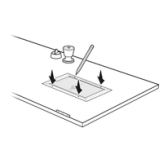
With the interior frame (with flap) placed in the cutout, mark the frame screw holes on your door.
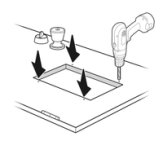
Remove the frame. Using a drill and ¼ inch drill bit, drill the screw holes in your door, making sure to keep the drill straight.
Install the Frame
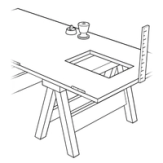
Measure the thickness of your door.
If your door measures 1 inch or less, continue to the next step.
If your door is thicker than 1 inch, skip the next step and continue installation with putting the frames into the cutout.
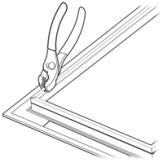
If your door is 1 inch or less in thickness, break away core frames from the interior and exterior pet door frames. Use pliers to slowly and steadily bend down small sections across core frame at the grooved line. Go across the frame again in the same direction working the excess frame into a 90º angle. Next go back across frame in the opposite direction to slowly break off the excess.
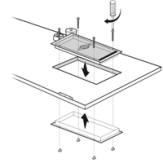
Place the interior frame (with flap) into the cutout from the interior side of the door. Then, place the exterior frame into the underside of the door. Hold the two frames together. Insert the nylon screws into the frame, then twist a screw sleeve on the end of the screw. Pull up on the screw to position the screw sleeve into the exterior frame and hold in place while tightening the screw until the frames come together.
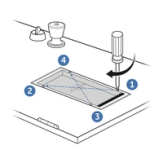
Using a Philips screwdriver, evenly tighten the screws moving from one screw to the next in a Criss-Cross pattern as much as possible, until all screws are hand tight. It may be necessary to adjust the screws to ensure the pet door is fit correctly.
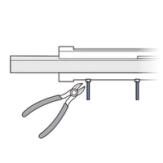
Cut off excess screw lengths with wire cutters. Hold wire cutters flush with frame for a clean, level cut. Any rough edges of nylon screws left by wire cutters should be removed with a metal file.
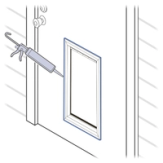
Reinstall your door on its hinges. Caulk around the exterior frame and fill any gaps between the door and the frame for weather resistance.
Contact Customer Care
If you need further assistance, please contact our customer care team.