How to Add the Extension Tunnels on My PetSafe® Wall Entry Pet Door
Important Information
- The Extension Tunnel is intended for installation in walls greater than 7 ¼ inches to 12 inches thick (Med/Large) or 10 ¾ inches thick (Small).
- Tunnel can be cut shorter to accommodate walls 7 ¼ inches to 8 ¼ inches thick.
- The Wall Extension Tunnel can be purchased from our website here.
Assemble Tunnel
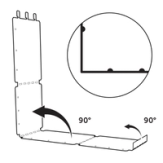
Unfold extension tunnel to a 90° angle at the bend. Fold up smallest section on the end of extension tunnel by hand at open slots to a 90° angle. Make sure raised dimples are to the inside of tunnel when bending.
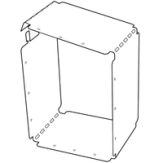
Continue to bend additional sections of tunnel to 90° angles in same direction until a rectangle is formed.
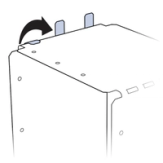
Insert tabs into open slots and fold tabs by hand to complete the assembly.
Slide the Extension Tunnel Over the Pet Door Interior Frame
The tunnel installation method depends on the thickness of your wall. Measure the thickness of your wall and follow the appropriate installation method.
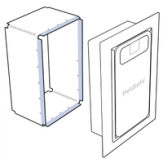
Wall Thickness 9 ½ Inches to 12 Inches
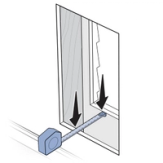
With the dimpled side of the extension tunnel facing the interior frame of the Wall Entry Pet Door, slowly slide the extension tunnel on the frame until the dimples make contact with the edge of frame.
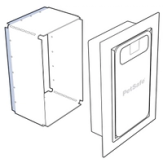
Wall Thickness 7⅜ inches up to 9⅜ Inches
Take your wall thickness and subtract 6 inches from it. Then take that number and divide it by 2. On the non-dimpled side of the extension tunnel, measure in from the edge that final number and mark it. With the marked side facing the extension tunnel, slowly slide the extension tunnel on the frame until the edge of the frames meets the mark.
Secure Extension Tunnel
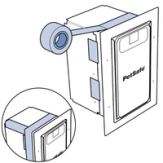
Once the extension tunnel is around the interior frame of the pet door, secure it in place with duct tape. Use short pieces of tape to help hold the position, then tape completely around the seam twice. Tape over the corner seams of the extension tunnel to help with weather resistance.
Install the Pet Door
Once you have installed the Extension Tunnel, you can continue with the installation of your Wall Entry Pet Door. For detailed instructions, visit our article How to Install the PetSafe® Wall Entry Pet Door.
Contact Customer Care
If you need further assistance, please contact our customer care team.