Healthy Pet Simply Feed™ 12-Meal Automatic Pet Feeder Set Up
Table of Contents
Welcome
Healthy Pet Simply Feed™ 12-Meal Automatic Pet Feeder
A Few Things to Keep in Mind:
Set up will take approximately one hour.
Three different meal modes to chose from.
Understanding Your Feeder
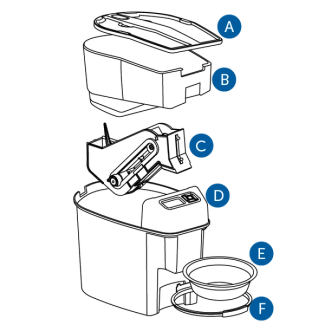
Lid
Protects the food inside the hopper.
Hopper
Stores dry or semi-moist food.
Conveyor
Portions out and moves food from hopper to bowl.
Base
Stores conveyor.
Bowl
Catches food released by the
Holder
Keeps bowl in place.

Battery Compartment
Holds 4 D-cell batteries.
Features:
Modes
Schedule meals based on pre-programmed or user selected options.
Slow Feed
Dispenses meals at a slower rate over a 15 minute period.
Button Lock
Buttons lock after five minutes of inactivity.
Pause Mode
Step 1: Preparation
Cleaning the feeder regularly helps prevent jams and error messages. We recommend cleaning the feeder before refilling.

Remove the components located inside the hopper by pulling back the finger latch and lifting up the lid.

Press the tab on the back of the feeder to lift the hopper out of the base.

Push back the red latch inside the feeder to remove the conveyor.
Clean the Following Components:

Bowl
Dishwasher safe

Bowl Holder
Dishwasher safe

Hopper and Lid
Dishwasher safe

Conveyor
Hand wash with warm water
Step 2: Install parts
Make sure all components are dry before installing them.
Batteries
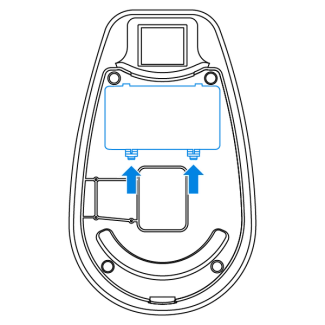
Push and lift battery cover tabs on the bottom of the base.
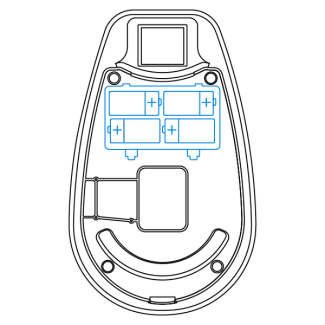
Install four D-cell alkaline batteries by matching the battery outlines.
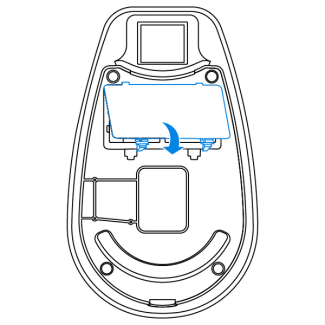
Replace the battery cover.
Conveyor
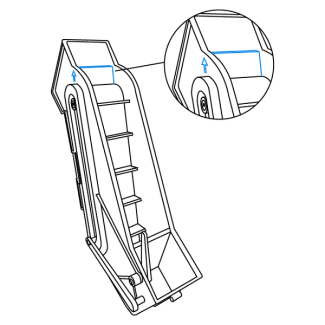
Align one driver panel on conveyor belt with alignment arrows on side of conveyor.
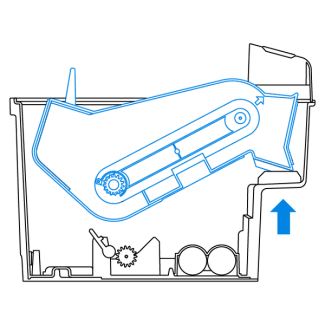
Place the conveyor so that it aligns with the front of the base.

Lower the back of the conveyor and push the red latch back in place to lock.
Hopper
Align the back food chute on the hopper so that the agitator on the conveyor sits inside the hopper, then place hopper into the base.

Push the hopper down until the release button audibly snaps into place.
Bowl

Connect the tabs on the bowl holder with the tabs on the base by sliding up into place.

Insert the bowl into the holder.
Step 3: Program Feeder
The feeder automatically enters into Setup Mode after batteries are installed. The screen will blink the number 12 to set time format.
Note: For 12 hour format, meals are set to cups. For 24 hour format, meals are set to milliliters.
12 hour

Use the up or down button to select 12 hour or 24 hour time format.

Press the right button to set time.

Use the up or down button to scroll and set the current hour to AM or PM. Press the right button to move to minute field.

Use the up or down button to scroll and set the current minute. Press the right button to set up feeding schedule.
24 hour
Use the up or down button to select 12 hour or 24 hour time format.
Press the right button to set time.

Use the up or down button to scroll to set current hour. Press the right button to move to the minute field
Use the up or down buttons to scroll and set the current minute. Press the right button to set up feeding schedule.
Feed Schedule
The screen will show the set time and the word [dog] will blink to begin setting the feeding schedule. The three feeding schedule options are:
- dog: Preset to deliver a 2 cup meals at 8 a.m. and 5 p.m.
- cat: Preset to deliver 1/4-cup meals at 8 a.m. and 5 p.m.
- usr: Use to customize the number of meals, meal times and meal sizes.
- Up to 12 meals each day
- Meal times can be set to 15 minute increments
- Meal size can be set in 1/8 cup increments with a minimum of 1/8 cup to a maximum of 4 cups.

Meal Number
Meal Time
Meal Size
Choose the feeding schedule that is best for your pet and follow the instructions below for the correct option.
Dog

Press the right button to select operating mode. The screen will display the time and size of the next scheduled meal.
Cat
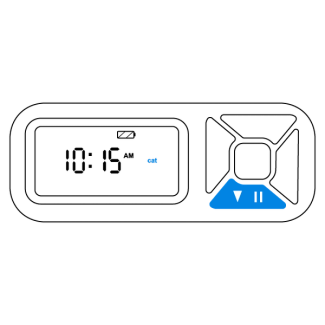
Press the down button to highlight [cat].

Press the right button to select operating mode. The screen will display the time and size of the next scheduled meal.
User

Press the down button two times to highlight [usr].
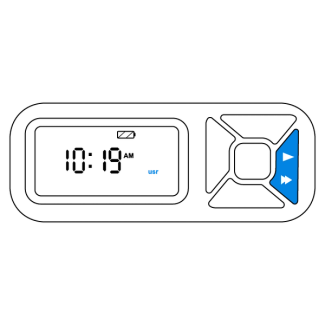
Press the right button to select the customizable meal menu.
Program User Selected Meal

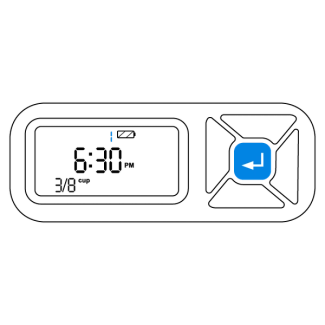
Press the right button to move to the hour field and use the up or down button to set the hour for [meal 1].

Press the right button to move to the minute field and use the up or down button to set the minutes for meal 1. Each meal can be set for 15 minute increments.

Press the right button to move to the meal size field and use the up or down button to set the desired amount. Meal size can be adjusted in 1/8-cup increments.

Press the right button to move back to the meal number and use the up button to program [meal 2]. Repeat the steps above.
Up to 12 meals can be programmed a day. Repeat the steps until the desired amount of meals have been reached.

Return to the meal number, then press and hold the center button for five seconds to exit programming mode and confirm the feeding schedule.
How To Program your PetSafe® Healthy Pet Simply Feed™
Step 4: Fill with Food

Place feeder in a desired indoor location.

Fill the hopper with dry or semi-moist pet food.

Replace the lid by aligning the front tab on the lid with the slot behind the control panel.
Prepare Conveyor with Food
Every time the hopper is empty or refilled with food, the conveyor must be primed.

To unlock the screen, press the center and up button at the same time.

Press and hold the center and left buttons at the same time.
Release the buttons when the conveyor motor is heard moving.
Pour any food back into the hopper that may have dropped in the bowl.
Important: If the food is not prepared in the conveyor before use, no meal or incorrect meal sizes will be dispensed.
Step 5: Features
Additional features are available while in operating mode. Follow these instructions for the desired addition.
Button Lock
The buttons lock after 2 minutes of inactivity. The lock icon on the screen indicates that the buttons are locked.
Press the center and up button at the same time to unlock the buttons.
Slow Feed Mode
The slow feed mode dispenses scheduled meals at a slower rate over a 15 minute period. This mode is useful when your pet tends to eat their food too quickly.
To Set Slow Feed:

Press the left button and the [turtle icon] will appear on the screen to indicate the mode is set.

To remove, press the left button and the [turtle icon] will disappear from the screen.
Pause Feed Mode
The pause function temporarily stops scheduled meals. This mode is useful to keep the conveyor in sync with the feeding schedule when cleaning the feeder. The mode must be cancelled to resume feeding schedule.
To Set Pause Feed Mode:

Press the down button and the [pause icon] will appear on the screen to indicate the mode is set.

To remove, press the down button until the [pause icon] disappears on the screen to indicate the mode is canceled.
View or Change Time
Follow the steps below to view or change the time without going through the setup process.
To View Time:

Press the up button quickly and the time will appear on the screen.
To Change 12-Hour or 24-Hour Format:

Hold the up button for five seconds for the time to appear with the hour field blinking.

Press the left button and the screen will blink the number 12.
Use the up or down button to select 12 hour or 24 hour format. Press the right button to set.
To Change Time:

Hold the up button for five seconds for the time to appear with the hour field blinking.

Use the up or down button to set the correct time. Press the right button to move to the minute field.
Use the up or down button to set the current minute. Press the right button to set the new time.
Setup Mode
Return to the setup mode to change, add or remove a scheduled meal. Meals can even be adjusted if set to dog or cat feeding schedule.
To Return to Setup Mode:
Hold the center button for five seconds for the meal menu to appear on the screen and display the next meal scheduled.
Follow the user instructions in Step 3 to change the meal settings.
Return to the meal number field and hold the center button for five seconds to program feeding schedule. The feeder will return to operating mode and display the next scheduled meal.